Friday 29 April 2016

Instant Carrot Pickle


Pickling is the process of preserving or expanding the lifespan of food by either anaerobic fermentation in brine or immersion in vinegar. Pickling began 4000 years ago using cucumbers native to India. This was used as a way to preserve food for out-of-season use and for long journeys, especially by sea. Although the process was invented to preserve foods, pickles are also made and eaten because people enjoy the resulting flavors. Pickling may also improve the nutritional value of food by introducing Vitamin B produced by bacteria.

Pickles are mainly made from varieties of mango, lemon, lime, tamarind and Indian gooseberry, Chili. Vegetables such as Brinjal, carrots, cauliflower, tomato, bitter gourd, green tamarind, ginger, garlic, onion, and citron are also occasionally used.

In chemical pickling, the jar and lid are first boiled in order to sterilize them. The fruits or vegetables to be pickled are then added to the jar along with brine, vinegar, or both, as well as spices, and are then allowed to ferment until the desired taste is obtained.

The food can be pre-soaked in brine before transferring to vinegar. This reduces the water content of the food which would otherwise dilute the vinegar. This method is particularly useful for fruit and vegetables with a high natural water content. In chemical pickling, the jar and lid are first boiled in order to sterilize them. The fruits or vegetables to be pickled are then added to the jar along with brine, vinegar, or both, as well as spices, and are then allowed to ferment until the desired taste is obtained. In chemical pickling, the jar and lid are first boiled in order to sterilize them. The fruits or vegetables to be pickled are then added to the jar along with brine, vinegar, or both, as well as spices, and are then allowed to ferment until the desired taste is obtained.

This is an instant Carrot Pickle which can be used for 3-4 days in refrigerator, just enjoy this damn delicious pickle with hot Paratha or Roti or with Puri. This crunchy, tangy and bit spicy carrot pickle is very perfect option when you don't have 
anything to enjoy with paratha or roti. My mom used to make this pickle, as when I was studying for my board exams, In my late night study, She used to make bunch of parathas for us and we used to enjoy this with many varieties of pickle which she make with some raw mangoes, lemons, carrot and one more which is a typical Rajsthani pickle kair ka achaar. That achaar is so so delicious. I was a fan of this carrot pickle, and still I am. Its very easy and quick pickle to make....Mustard Oil, Nigella seeds, Hing are the most important ingredients of this pickle. So, check out the step by step recipe below and enjoy this Carrot pickle with paratha or roti. :)


Ingredients

1 cup carrot, cut into slices
2 tbsp Mustard oil
1/4 tsp Asafoetida
1/2 tsp Nigella seeds (kalonji)
1/2 tsp Fennel seeds, Coarsely Powdered
2 tsp split fenugreek seeds
2 tsp split mustard seeds
1 tsp chili powder
Salt to taste

Method:

    1. Combine all the ingredients, except the oil, in a bowl and mix well. Keep aside.


    2. Heat the mustard oil in a small pan, add it to the carrot mixture and mix well.
    Serve immediately or keep refrigerated till use.

Monday 25 April 2016

Vegetable Hakka Noodles


The Hakka people have a marked cuisine and style of Chinese cooking which is little known outside the Hakka home. It concentrates on the texture of food – the hallmark of Hakka cuisine. In fact, the raw materials for Hakka food are no different from raw materials for any other type of regional Chinese cuisine: what you cook depends on what is available in the market. Hakka cuisine may be described as outwardly simple but tasty.

In India and other regions with significant Indian populations, the locally known "Hakka cuisine" is actually an Indian adaptation of original Hakka dishes. This variation of Hakka cuisine is in reality, mostly Indian Taiwanese cuisine. It is called "Hakka cuisine" because in India, many owners of restaurants who serve this cuisine are of Hakka origin.


I am not a fan of noodles, but sometimes I can have it for a change. When I have it I used to order vegetable Hakka noodles, they are simply delicious and love to have them. The tangy, sweet and spicy flavor of these noodles with loads of vegetables makes this dish so inviting. That crunchy flavor of vegetables and noodles coated with sauces are so so tempting. its easy to make and anyone can enjoy it in a dinner or anytime when you are craving to have something in Indochinese dishes. This is our 37th #Foodiemonday Blog hop event and we foodies decided to post #Indochinese recipes on our blog and I am contributing very popular and delicious vegetable Hakka noodles recipe. So check out the step by step recipe below and enjoy the Indochinese flavor ;)


Ingredients:

21/2 Cups Noodles
1/4 Cup Chopped Onions
1/2 Cup sliced capsicum
1/2 Cup Sliced Carrot
1/2 Cup shredded Cabbage
1/4 Cup sliced French beans
4 cloves, Garlic
1 tsp vinegar
11/2 Tbsp Soy sauce
1 Tbsp Red Chili sauce
1/2 tsp Tomato ketchup
1 tsp Ginger, minced
1/4 tsp Black Pepper Powder
11/2 Tbsp Oil
1 Pouch of Maggi masala 

Method:

1. Boil the Noodles by adding oil and salt, and cut the Vegetables in thin slices. In a bowl add vinegar, soy sauce, red chili sauce, tomato ketchup mix it well and keep it aside.


2. Heat the oil in a pan and add Garlic and Ginger and onions. Saute it properly.


3. Now add french beans, Capsicum, Cabbage, and again stir fry them well, Stir fry vegetables until they are cooked but still crunchy. Add Maggie Masala for extra taste. (Note: This absolutely optional, I love this maggie masala in my any chinese recipe, I do add this masala for extra flavor).

4. Add the prepared sauce and salt. Mix it well and cook for a minute. 


5. At the end, add boiled Noodles, mix and toss until Noodles are evenly coated with sauces and vegetables for approx a minute. Turn off the flame and transfer it to serving plate. Serve it with cold drinks of sour soup.

Enjoyyyyyyyyyyyyyy!!!!!!!!!!!!!!!!!!!!!!!

Monday 18 April 2016

Coconut Sandwich


A picnic is an excursion at which a meal is eaten outdoors, ideally taking place in a scenic landscape such as a park, beside a lake or with an interesting view and possibly at a public event such as before an open-air theater performance, and usually in summer. Descriptions of picnics show that the idea of a meal that was jointly contributed and was enjoyed out-of-doors were essential to a picnic.

Picnics are often family-oriented but can also be a good time between two people or a large get-together such as company picnics and church picnics. It is also sometimes combined with a cookout, usually a form of barbecue; either grilling, baking, or a combination of all of the above.

As my in laws are in town, we were thinking to have picnic at sea line beach in doha, and when Our foodiemonday team has decided to have Picnic theme, It was very very easy and nice theme for me !! My family, and two more family were about to join us but due to weather change we could not make it to reach there, It takes almost one and half hour to reach there from my place, On a Friday we were thinking to go there, Then a plan is changed and we went to Aspire Park, which is very huge and big park to hang on. we just took some food with us and just drop in to that Park. My Inlaws loved this park, They enjoyed this small picnic at Aspire and prisha was like in heaven, because there are so many slides, games and lot more for kids. She enjoyed the evening so much and thts a worth time spend at Aspire park. we took so many pics, and it was tough to make them wait to take food pics when they were so so hungry ;) I made this easy coconut flavor Sandwishes and they liked it so much :) I didnt grilled them because when we reach there, It becomes so soft and himanshu don't like cold grilled sandwich, so I packed them as they are. besides these sandwiches I packed some Fruit, muffins, Popcorns, Chocolates, Croissants, and Chocolate Rolls and juice. I took these Pictures in hurry. So couldn't take each and every items pic. Tried to cover them all :) It was a lovely Evening and we enjoyed it a lot.


This is our 36th Foodiemonday Bloghop event, and we are celebrating Picnic theme and It was really a fun theme, Thanks to Krithika by suggesting this theme and You guys can have loads of idea to enjoy your picnics with this wonderful recipes!! Mine is Fresh Coconut sandwich and the taste was really yummy!!! I grated this fresh coconut in a bit thick slices, added roasted them with some cumin and fennel powder. I love that chunks of coconut, you can simply grate them thinly, or whatever you like, it tastes good with green chutney and red chili sauce, So Check out this wonderful and new version of sandwich recipe here and Enjoy!!! :)


Ingredients:

3-4 Potato
1/4 Cup Chopped Onion
1/4 Cup Roasted Capsicum, chopped
1/4 Cup Grated Carrot
2 Tbsp Grated Fresh Coconut
1/4 tsp Cumin Powder
1/4 tsp fennel Powder
1/2 tsp Red chilly powder
1/4 tsp Turmeric Powder
1/4 tsp Dhaniya powder
1/4 tsp Garam masala powder
1 tsp Sugar
Salt to taste
Coriander leaves
Some Lettuce leaves
1/2 Cup Green Chutney
1/2 Cup Red chili Sauce


Method:

1. Cook the Potato in a pressure cooker for 2 whistles, peel the skin and mash it.

2. Take a pan and add Grated coconut in it and add Cumin powder, and Fennel seeds Powder and pinch of Salt. cook this for 2 minutes and transfer this to another bowl to cool it and keep it aside.

3. Now take another Bowl and add this mashed Potato and add all the chopped and grated vegetables, coconut mixture and add red chili Powder, Cumin Powder, Fennel Powder, Dhaniya Powder, Garam Masala, Turmeric powder, salt and sugar, Mix this well. 

4. Take a bread slice and apply Green coriander Chutney on it and the Plenty amount of Potato stuffing. Apply Red chili sauce on it. Take another slice of bread and apply butter as needed. Close it with the bread slice which has stuffing.

5. If you want you can grill it, To grill it, Apply some butter on the sandwich maker and top of the bread slice, toast it or toast it in a griddle. Cut it into two triangles.


Serve it Hot!!!:)))


Thursday 14 April 2016

Homemade Baked Donuts


A Donut is a type of fried dough confectionery or dessert food. The donut is popular in many countries and prepared in various forms as a sweet snack that can be homemade or purchased in bakeries, supermarkets, food stalls, and franchised specialty outlets. They are usually deep-fried from a flour dough, and typically either ring-shaped or without a hole, and often filled. You can also bake them, I am making here baked donuts, They are so tasty, delicious, soft and spongy and Glazed them with some strawberry and chocolate flavor, and some are plain or without glaze.


These are the Mini Donuts, so you can easily give your kids in their lunch box, They can simply bite them and enjoy these yummy donuts in their lunch break. As I gave these both flavor donuts to Prisha in her lunch box, and she finished them off, which was so so surprising for me, as she don't finish her lunch box properly :( I need to try something which she can have it in her lunch break. today she told me that her friend got noodles in her lunch box, and she also wants to have it in her lunch box ;) Lol. If I offer her to have noodles she will definitely refuse to have it. Its very tough to convince them to have this or that food. These donuts are beautiful, colorful and yummy. Normally donuts are fried, here I am trying to make them baked. And they came out so nicely and its a no fail recipe. So check out the baked version of mini donuts and enjoy it :)


Ingredients:

11/3 cup all purpose flour
2 tsp Baking powder
1/4 tsp salt
11/2 Tbsp Yogurt
1/2 cup sugar
3/4 cup milk
3 Tbsp oil
2 tsp Vanilla Essence

Method: 

1. Preheat oven to 180 degree and grease donut pan.

2. In a small bowl, mix together flour, baking powder and salt. Set aside.


3. In a medium bowl, whisk together Yogurt and sugar. Then add milk, oil, and vanilla essence; mixing until well combined. Gently stir in the flour mixture, whisking until there are no lumps.


4. fill each donut pan 3/4 full. Bake for 15-20 minutes, or until a toothpick inserted in the donut comes out clean. Place donuts on a cooling rack and cool completely.


How to make Donut Glaze

Ingredients:

1/2 cup melted butter
1/4 cup milk
1 tsp light corn syrup
2 tsp vanilla extract
2 1/2 cups icing sugar

Method:

1. In a small bowl whisk together melted butter, milk, corn syrup and strawberry flavor powder. Add icing sugar, whisking until smooth.


2. Dip the top of each donut into the icing and transfer to a wire rack and let set for 5 minutes. Serve immediately, or donuts can be stored in an airtight container for up to three days.

Enjoyyyyyyyyyyyyyy!!!!!!!!!!!!!!!

Monday 11 April 2016

Rose Srikhand


 Shrikhand  is an Indian sweet dish made of strained yogurt. It is one of the main desserts in Kerala cuisine, Gujarati cuisine and Maharashtrian cuisine. Preparation of this dish is very simple but it takes some time to process yogurt properly. To prepare shrikhand, yogurt is tied in a cotton cloth and left under pressure to drain. In the past, it used to be hung from a wall to achieve the desired thickness. The strained yogurt, referred to as "Chakka", and sugar are mixed thoroughly in a deep bowl. Cardamom, saffron, and any other flavors are then added and mixed. It is then left in the refrigerator for the sugar to dissolve. The dish is served chilled. This is called simple cardamom Srikhand. Its a plain version.
A popular variation of shrikhand in Maharashtra is Amrakhand, which is shrikhand blended with mango pulp. Another variant of shrikhand, Matho, is served as a sweet dish or dessert particularly in Gujarati cuisine. There are so many variations in Srikhand.
- Shrikhand mixed with some mango pulp is popularly known as 'Amarkhand'.
-When fresh fruits are mixed in, the shrikhand is commonly referred to as 'Fruitkhand' or 'Matho'.
-Add in your choice of mixed nuts and fruits with the basic Shrikhand to make a 'Mixed Fruit & Nut Shrikhand'.
-You can also mix in any one particular fruit of your choice. Some of the options are mango shrikhand, Pineapple shrikhand, Apple shrikhand, strawberry shrikhand, Blueberry shrikhand, raspberry shrikhand and chikoo shrikhand.
There are also variations of shrikhand depending on the nuts that you mix in like pista shrikhand (with pistachios), kaju shrikhand (with cashews), badam shrikhand (with almonds).

This all flavors I have already tried so was thinking to have something new in flavor and I am a die hard fan of tutty fruity, So love to have it in my any Srikhand recipe, here I am mixing Tutty Fruity in Rose flavor, Used Rose flavor syrup in the Srikhand Mixture, and the taste is like heaven. Truly truly Heaven. My In laws are just arrived yesterday here in Doha, and Ofcourse when they are here, Something new and attractive must be served. Summer is almost high here in Doha too, So to take chill pill, Srikhand is best dish to serve, and to enjoy chill in this summer. So tried this Rose flavor Srikhand. Addition of Tutty Fruity is like cherry on the top of the cake. ;) This is our

In Gujarati cuisine, Shrikhand is eaten as either a side-dish with breads such as poori or as a dessert. It is commonly served as part of a vegetarian Thali in Gujarati restaurant.

ts and is popular as part of wedding feasts. It is often served chilled as a counterpoint to hot and spicy curries. Dried and fresh fruit such as mango are also added. This is our 36th Foodiemonday Bloghop Event and theme is #navratrispecial, So No Onion and No Garlic dish needs to be post, So simply turned to the dessert one, and It is My favorite Srikhand with Rose flavor. So, check out the step by step recipe below and Enjoyyy!!! Happy Navratri to all of you :)


Ingredients

3 Cup Yogurt (full fat preferable)
3/4 Cup Sugar Or as needed
1/4 Cup Chopped nuts, Almonds, Cashewnuts
3 Tbsp Tutty Fruity
3 Tbsp Rose Syrup
1/4 tsp Rose Essence
Muslin Cloth

Method

1. Take a clean muslin cloth or any thin cotton cloth and put the yogurt in it. Wrap the cloth and tie it. Now hang it or put it on a strainer to drain out all the water content. I simply Put it on a strainer and drained out all the water from the yogurt.

2. After a few hours (min 1 hour or even overnight), you will have a thick mass of yogurt left. Like this.


3.Take the thick yogurt in a bowl and add the sugar to it. Whisk with a spoon till the sugar gets dissolved and it becomes creamy.

4. Now add all the chopped dryfruits, tutty fruity, and mix well, Now add Rose syrup and Rose essence. Mix it well..Your Rose Srikhand is ready, Put it in a fridge and serve it chill.


This is served as a side dish with chappatti or poori.
Enjoyyyyyyyyyyy!!!!!!!!!!!!!!!!!


Saturday 9 April 2016

Andhra Style Corn Vada


Vada is a common term for many different types of savory fritter-type snacks from South India with a set of common ingredients. Due to their popularity, they have spread throughout the world. Vada can vary in shape and size, but are usually either donut disc-shaped. As well as being commonly prepared at home, Vada are popular items in street stall. They are eaten throughout the day but most commonly as a part of breakfast alongside idli- sambar or in teatime too. Vada are generally prepared from a thick batter of gram flour or coarsely ground Bengal gram which has been fermented or not fermented. This mixture is then seasoned by mixing with cumin seeds, onion, curry leaves, salt, chillies and/or black pepper grains.

Corn Vada are very famous tea time snack, But Andhra style Corn Vada are quite delicious and love to make them anytime...Chana dal, Indian Corn kernels, Ginger, Green chilies, makes this Vada so so delicious...Crispy, Spicy and yummy Corn Vada are hot favorite at my home. 


Normally We dont prefer fried food much at home, But sometimes we would love to have them, As we used to make Aloo Bade, Some Onion Fritters, Mix veg Fritters. Since a week the weather is so good in doha, Its a cloudy one, So automatically You feel to have something like this, Yesterday the sky was full of clouds, and I had only one thought in my mind to have "Bhajias" (Fritters), Since so many days I didnt make tgis Andhra style Vada, So land up with this thought that today when Himanshu will come back to the home, I am going to give him this hot hot Vada for his everyday snack craves after office. He came and I served him this Andhra style Corn Vada, And he loved it. A big smile on his face :) Even Me and prisha enjoyed this Corn Vada before he came ;) she also liked it. she had only one Vada but thts ok, Atleast she had it, Thts enough for me. So If you want to make this delicious Andhra style corn vada, lets take a tour of the recipe below :)


Ingredients:

1/2 Cup Chana daal, Soaked and drained
11/2 Cup Corn Kernels
2 Green chilies
1 Piece Ginger
2 Dry Red chilies
1/2 Cup Onion, chopped
1/2 tsp Cumin seeds
1 Tbsp Curry leaves
4 Tbsp Coriander leaves, chopped
1/4 Cup Gram Flour
Salt to taste

Method:

1. Take a mixer jar and add soaked and drained chana dal, corn kernels, Ginger, Green chilies, Curry leaves and dry chilies, make as coarse paste.


2. Now, Take a Bowl and transfer this coarse paste in it add Gram flour, chopped coriander leaves, Cumin seeds, Sweet corn kernels, salt to taste, Mix this mixture well.


3. Heat a deep pan with Oil, Take some oil on your palm and make Vada, deep fry them and put them on a tissue paper for sometime and serve them hot with any chutney.


Enjoyyyyyyyyyy!!!!!!!!!!!!!!


Wednesday 6 April 2016

Besan and Green pea Cheela


Besan flour is naturally higher in protein than wheat-based flours. Even though that’s double the fat of whole-wheat flour, 70 percent of the fat in Besan flour comes from healthy unsaturated fats that can lower cholesterol. 

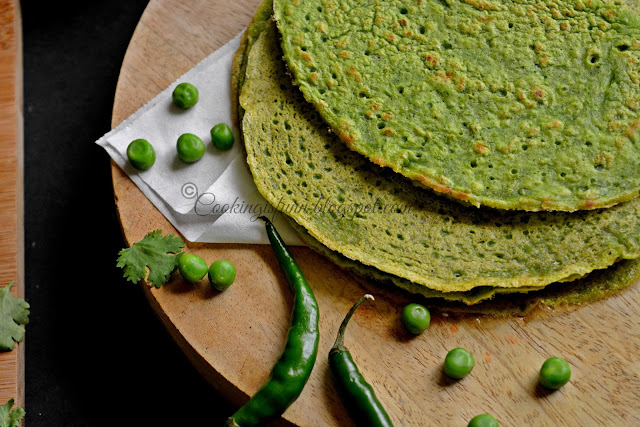
Besan flour is usually mixed with water, olive oil, yogurt or milk to make a paste that can be any consistency depending on the desired use. The paste is seasoned with any combination of parsley, cumin, coriander, turmeric, red chili, onion or garlic. It’s traditionally cooked in a skillet to create a flatbread or fried into fritters. Use a thick Besan flour batter to coat and fry vegetables a thin batter and fry them into appetizer-like pancakes. As I am here going to make super delicious Green pea cheela... Super easy, healthy and quick Breakfast or Teatime snack. I love the flavor of this cheela when garlic, onion and coriander leaves are added while making the paste. Yes I am saying that its a nice breakfast recipe, But when I am hungry I simply take besan, add spices, salt water and make batter, roll the batter on Tawa cook it and your simple cheela is ready to eat..


This is so so quick, its so easy that even Himanshu can also make it...and He made this once, It was our anniversary and on the same day I had my first Nikon training session, so had to attain it. went there in the morning, It was a weekend and reached there without having breakfast, Just had a coffee......Himanshu knew this and when I came back, guess what, He made this delicious cheela for me, and he was waiting for me....That was so so adorable moment for me...You can make so many varieties of cheela, it can be make by carrot, Tomato, Green peas, I am making Green pea Cheela here. It tastes good when it serve with any Raita, or you can have this with simple curd, any Pickle or all time favorite Tomato ketchcup. I Enjoyed this Green Pea Cheela with Carrot Rice and Simple Curd with some hint of sugar in it...Mmmm, So so delicious!!! So, check out the step by step recipe of super healthy, tempting and anytime snack...!!!


Ingredients:

1/4 Cup Chickpea Flour
1/2 Cup Green Peas
Small Onion, roughly chopped
3 Garlic Cloves
2 Green Chilis
Ginger Small piece
1/4 cup Coriander leaves
1/2 tsp Carom seeds
1/4 tsp Fennel seeds Powder
1/ 4 tsp Sesame seeds
1/4 tsp Red chili powder
Pinch of Garam masala
Salt to taste
1 tsp Oil
Water to make batter

 Method:

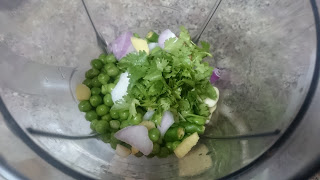
1. First take a mixer jar and add Green peas, Garlic, Onion, Ginger, Coriander Leaves, add little water and make a paste.


2. Take a Bowl and add chickpea Flour, Green peas paste, Fennel seeds Powder, Sesame seeds, Carom seeds, and all the spices. add salt to taste.


3. Now add water as required to make batter.


4. Heat a skillet and pour the batter and make a chila like we make dosa. Apply oil on cheela as needed, Cook it from both the sides, Take out from the Skillet and Enjoyy the hot chila with any raita, ketchup or Pickle.


Enjoyyyyyyyyy!!!!!!!!!!!!!!!!!!!!