Sunday 31 May 2015

Mumbai Style Vada Pav (Indian Burger)


One of my favorite items growing up was the "Vada Pav". Straight out of the heart of Maharashtra in Western Indian, Vada Pav has iconic status in India. It used to be "poor man's food", but these days even the rich and famous can be spotted eating it at Bombay's (Mumbai) numerous roadside food stalls! It consists of a Batata Vada (Potato fritter) sandwiched between two slices of a Pav (bread). Batata is potato in Marathi and Pav refers to bread (or bun).

Finely cut green chilies and ginger and tempering of mustard seeds and turmeric are added to a mash of boiled potatoes, and after dipping patties of the mash in an herb-seasoned batter of gram flour, the patties are deep-fried.

Vada Pav is typically served with a chutney (sauce) which is commonly made out of shredded coconut tamarind pulp, and garlic. There are many variations to make this yummy Vada Pav’s. Today I am sharing a different version of  Vada Pav. I just loved the taste of this Mumbai Vada Pav. Today evening I just thought of making Vada Pav. The spice of chilies and hot vadas gave me a sweat…….It was spicy and tasty…..Yummy. I ate 3 Vadas which is unbelievable that too with 4 chilies….. Gosh!


Variations of the above basic dish include

Cheese Vada Pav (where slices of cheese are added);
Samosa Pav - where a "samosa" is used instead of a Vada
Jain Vada Pav - where Vada ingredients do not include onions, garlic and potatoes
Bhajji Pav - where onion fritters are used
Vada pav served in the nearby state of Gujarat is usually fried in Butter or edible Oil. The Pav is first fried in a mixture of Butter or Oil and dried red chilly powder. After that the chutney is applied in the hot fried Pav and the Vada is placed in between. This is the only difference between Vada pav in Gujarat and Maharashtra. In the state of Gujarat, the original unfried Vada Pav recipe is referred to as "Bombay Vada Pav".

There are thousands of Vada Pav stalls all over the city and everyone will tell you that their local Vada Pav stall is the best in the city. If you ever hit Mumbai, make sure you get one. Lets have a spicy journey of these amazing and yummy Vada Pav!!!!!!!!!!


How to Make Mumbai Stye Vada Pav

Ingredients 

2 Potatoes Boiled
2 Green Chilies
10-12 Curry Leaves (Kadipata)
10-11 Garlic Cloves
1 inch Ginger
1 t/s Mustard Seeds
1 t/s Turmeric
1 t/s Hing
1 cup chopped coriander leaves
2 tbsp Lime juice
1 tsp Garam Masala
6 to 7 Pav's
2 cup Oil
5 tbsp Gram Flour
2 tbsp Water

Method:

1. Take boiled potatoes. Chop them into medium size.

For Green Paste:
Combine curry leaves, Chopped Ginger, Garlic Cloves,
Green Chilies grind them coarsely in grinder with some of water. don't
make this paste too thin.

For Tempering:

1. Take 2 tbsp Oil in a small pan. Once oil is hot add mustard.

2. When the mustard crackles add Asofoetida. Remove from fire.
Combine tadka, Greenpaste, ½ cup coriander leaves, Garam Masala along
with salt and lime juice in the chopped Potatoes. Mix evenly with your
fingertips..

3. Form small balls out of it. You could from 5 to 7 balls easily. If the
potato mixture is sticking to your finger. Rub some oil to your finger.
Once all small balls are formed. keep it aside.


4. Take a Wok or vessel. Add Gram Flour and water to form a paste.
Ensure the paste is thick not thin. Add salt and rest ½ cup coriander
leaves to it.


5. Get a big pan for frying. Pour oil for deep frying. Once the oil is
hot. Dip Potato balls into gram flour batter. Gently place them in the
oil with your finger or spatula. Ensure you fry these Vada on low
flame. Else it might burn. Once they become nice golden brown and
crisp. Your vada is ready.


6. Dab some tissue paper on it to remove excess Oil.


7. Fry the rest of vadas and serve on a platter with Fried Green chili.

8. Take pav slice them into 2 halves. Rub some chutney or sauce on the Pav. Place this hot vada between the pav. Your hot Vada Pav is ready.

9. Serve Mumbai style Vada Pav's hot with sweet chutney, spicy chutney or Sauce.


Ohhhhhh, Its spicyyyyy!!!!
Enjoyyyy the Spicinesssss!!!!!


Tuesday 26 May 2015

Vegetable Open Hot Dog Buns


Loads of fiber and vitamin-rich veggies and low-fat butter go into these sandwiches with a difference. Low in calories, the whole wheat Buns are apt for weight watchers, diabetics and people with heart disease.

Hot dogs are commonly paired with a bland hot dog roll made from flour that has been bleached and thoroughly denatured, only having to be fortified again with nutrients. My hot dog gone starts with a whole-grain hot dog roll. Unfortunately, finding a whole-grain hot dog roll can be a challenge in an average grocery store. (You may have more luck at health and natural food stores.) Your best bet may be just a slice of multi grain bread. But, Fortunately I found them, and this time, I don't want to wrap it, I just want to make it like an Open Sandwich, So These are the Open Hot Dog Buns!!! Very Quick and Easy to make it, and Yes, They are Superrrr Yummy!!! Ideal for kids Party or in a kids Lunch Box too. So For that we will need:


Ingredients

2 whole wheat hot dog Buns
1/4 cup finely chopped onions
1/4 cup Finely Chopped Capsicum
1/4 cup chopped carrots
1/4 cup chopped French Beans
1/2 cup Green Peas
2 tsp olive oil
1/4 cup low-fat milk
salt to taste
1/2 tsp dry red chili flakes (paprika)
1/4 tsp Oregano
1/4 tsp Garlic Powder
1/4 tsp Mint Powder
2 tsp melted low-fat butter for brushing
4 tsp tomato ketchup

Method

1. Cut each hot dog roll horizontally into 2 halves.

2. Scoop the center of each hot dog roll halve, using a spoon so that a light depression is formed for the stuffing. Keep these scooped bread crumbs aside.

3. Heat the oil in a non-stick pan, add the onions and sauté on a medium flame for 1 to 2 minutes.
Add capsicum and sauté, Then add carrots, Green Peas, French Beans (You can use any vegetables of your like etc. Baby corn, Cabbage, Broccoli ) and sauté on a medium flame for 1 to 2 minutes.


4. Add the milk, salt, Oregano, Garlic Powder, Mint Powder and chili flakes and cook on a medium flame for 1 to 2 minutes, stirring continuously.


5. Divide the topping into 4 equal portions and keep aside.

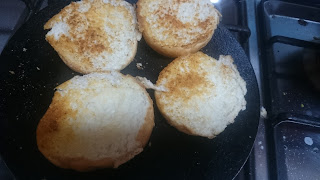
6. Apply ¼ tsp of butter on both sides of each hot dog roll halve and toast them lightly on a tawa, till both sides are golden brown in color.

7. Place one toasted hot dog roll half on a clean, dry surface with the scooped side facing upwards. Spread a portion of the topping evenly in the scooped bread.

8. Repeat make 3 more open hot dog rolls.

Serve immediately. Enjoyyyyyyyyyyyyyyyyyyyy!!!!!!!!!!!!!!!!!!


Monday 25 May 2015

Homemade Fresh Fruit Icecream


I Scream, You Scream, We all Scream for an ICE CREAM!!!!!! :))

Complicated recipes make me lazy, very lazy. I neither like those which need to be prepared in steps nor those who need to be left aside in the fridge for hours. What I most like in the kitchen is the possibility of thinking and creating something quickly with no planning, prototyping or validation. Once you decide to prepare a dish, you mix some ingredients and a little while later… done! You can eat it – and, if everything goes according to your idea, you will sigh of pleasure!

If eating ice creams is one of your ways to cool down during summers, this time around, give the artificial flavors a miss and try fresh fruit in your cones and ice cream bowls instead. 
Make the homemade dessert with enticing Mango or Kiwi; the choices are aplenty. "Using fresh fruit is a healthy idea as it gives energy and hydrates you. It also has fiber, which is important in summer, so it presents nutritional value as well as taste.


What's better than fresh picked fruit? So let's take some fresh-picked fruit and make our own homemade ice cream!  It is actually quite easy. You can make plain vanilla ice cream, strawberry ice cream, peach ice cream, raspberry, blackberry, blueberry, or many other flavors! If you have an ice cream maker that requires ice and salt instead of the freezer bowl. Here, we go with short and simple recipe with condense milk...Its easy and trust me ice cream goes simplyyy yummmm!!!!


Ingredients:

1/2 tin (200g) -NESTLÉ MILKMAID Sweetened Condensed Milk
1- 1/2 cups (225 ml)-Milk
1- 1/2 cups-Fresh Cream
1 tsp-Vanilla Essence
1/2 Cup Chopped Mango
1/4 cup Chopped Kiwi
1/4 Cup Chocolate Chips
1/4 Cup Kiwi Sauce
1/4 Cup Strawberry sauce

Method:


1. Whip cream with an electric beater in a deep bowl till light and fluffy.


2. Mix together NESTLÉ MILKMAID Sweetened Condensed Milk, milk and vanilla essence. Fold in the whipped cream.


3. Pour into a mould and cover with aluminum foil and freeze. Whip when half set, add chopped Fresh Fruits and freeze in another air-tight container to avoid Ice crystal.


How to make Kiwi Sauce

1 tablespoons unflavored gelatin powder
1⁄4 cup cold water
1 kiwi fruits
1/2 cup sugar
Pinch Green color (Optional)

Method:

1. Sprinkle gelatin over the cold water and set aside to soften. Peel the kiwifruit and blend in a food processor or blender until pureed. Be careful not to over-process; the black seeds will break and change the color of the puree.


2.  Add the gelatin mixture to the kiwi puree. Heat mixture; do not overheat. If mixture gets too hot, pull off heat and stir constantly. Continue to stir until all gelatin is dissolved. Keep covered in a refrigerator.


Awesome over ice cream - you could use this on any dessert you wanted!

Your Yummyyy Milkmaid Ice cream is Ready to serve!!!!

Enjoyyyyyy!!!!!!!!!!!


Wednesday 20 May 2015

Grapes Popsicles


Hardly worthy of a “Recipe,” did you realize that grapes freeze well and make great little bite-sized popsicles? Indeed they do.


Well, My daughter loves Popsicle a lot, but that sugar coated lollipops, and she keep that pops in her mouth for long time.....I am so much worried she might damage her teeth by having them on and on....So for her, I have to think something that which can give her that pops fun and her mom also don't worry if she having that.... So, Nowadays loads of grapes are coming in market, just yesterday I was in grocery store and I found these sweet Red grapes, I had a click in my mind and just tried to make it in a fun way....So lets Enjoyyyy these amazing looking Popsicles!!!!! 

Ingredients:

9-10 Your Favorite Red Grapes
1/4 Cup Sugar
1 Tbsp unsalted Butter
2 Tbsp Fresh Cream
1/2 Cup White Chocolate (Melted)
Popsicle sticks (As required)
3-4 Tbsp Peanuts crushed
Color vermicelli (For garnishing)


Method:

1. Wash your grapes well and allow them to drain dry. 


2. Pierce the grapes with Popsicle sticks. 


3. To make a caramel Sauce:

  • In a heavy-bottomed saucepan, combine the sugar and water over medium-low heat until the sugar dissolves. Increase the heat and bring to a boil, without stirring. If necessary, use a wet pastry brush to wash down any crystals on the side of the pan. Boil until the syrup is a deep amber color, about 5 to 6 minutes. 
  • Remove the sugar from the heat and carefully whisk in the heavy cream. The mixture will bubble. Stir in the unsalted butter 
  • Transfer the caramel to a dish and cool. 


3. After cooling the caramel, pour the caramel on bottom part of grapes and put them in a fridge for 5 minutes.


4. Meanwhile, melt the white chocolate by a double boiler technique or in a microwave.


5. Then dip the upper part of a grapes in a white chocolate bowl and simply top up it with crushed peanuts, and color vermicelli.


6. Again Put these Popsicles in a fridge again for 5 minutes....Serve these amazing and colorful popsicles.....Yippppeeeeee!!!!!!!!!


Enjoyyyyyyyyyyyyyyyyyyyyyy!!!!!!!!!!!!!!!!!